iOS App Testing
Complete guide to iOS testing covering unit tests, UI tests, E2E testing, automation strategies, simulator vs real device testing, and beta distribution through TestFlight and Ad Hoc methods.
What is iOS Testing?
iOS app testing or mobile application testing is the process of evaluating an application's functionality, performance, and overall user experience. The goal is to ensure that every feature works as expected, to detect logic errors, catch UI issues, identify performance regressions, and confirm that the app delivers a smooth and reliable experience across all supported devices.
Testing is performed under different hardware and software conditions, and the application is assessed across multiple criteria such as performance, installation and load times, UI behavior, user experience, and overall stability. Because iOS apps may be native (written in Swift or Objective-C) or cross-platform (built with frameworks like React Native or Flutter), the testing process must account for architectural differences, UI rendering variations, OS compatibility, and device-specific behaviors.
iOS testing can be performed in several ways, including manual testing on real devices and simulators, as well as automated testing using various iOS app test automation tools and frameworks. Each testing method and when to use it will be covered throughout this guide.
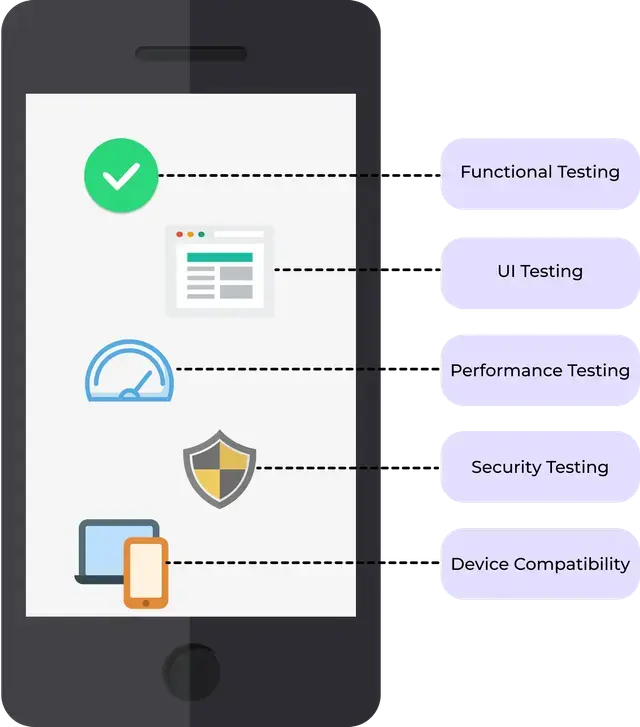
Types of iOS App Testing
- Functional Testing: Verifies that each feature of the app works correctly according to the requirements.
- UI Testing: Ensures that user interface elements render and behave as expected across screens and interactions.
- Performance Testing: Measures the app's speed, responsiveness, and stability under different conditions.
- Security Testing: Checks for vulnerabilities, data protection issues, and compliance with security best practices, often using tools such as SonarQube and Fortify to identify insecure code patterns and potential risks early in the development process.
- Regression Testing: Confirms that new changes do not break existing functionality or introduce unexpected issues.
- Localization Testing: Validates that translated content, layouts, and region-specific formats appear correctly in each supported language.
- Device Compatibility Testing: Ensures the app functions properly across different iOS devices, screen sizes, and OS versions.
- Snapshot Testing: Captures and compares UI snapshots to detect unintended visual changes during development.
- Accessibility Testing: Verifies that the app is usable for people with disabilities by meeting accessibility guidelines and standards.
Common Challenges in iOS Testing
1. Device and OS Fragmentation
New iPhone and iPad models are introduced regularly, while many users continue running older devices and legacy iOS versions. This results in dozens of combinations of screen sizes, hardware profiles, and operating system behaviors. Achieving consistent functionality and performance across this entire matrix is one of the biggest challenges in iOS testing.
Solution: Use a diverse device lab including both simulators and real devices, and incorporate automated testing across multiple OS versions in your CI/CD pipeline.
2. Network and Real-World Conditions
iOS apps must remain reliable under poor connectivity, slow networks, offline usage, and real-world constraints such as background transitions or unexpected interruptions. Reproducing these conditions consistently can be difficult without the right tooling.
Solution: Use network conditioning tools and automated test scripts that simulate offline, low bandwidth, and unstable network states to validate real-world behavior.
3. Security Concerns
Many iOS apps handle sensitive data, including authentication tokens, user profiles, and payment information. Identifying vulnerabilities early is essential to prevent data leaks, unauthorized access, or insecure storage practices.
Solution: Incorporate security testing tools, enforce secure storage (such as the Keychain), and validate API communication through HTTPS, certificate pinning, and secure coding practices.
4. Regional and Localization Testing Challenges
With global usage comes the need to support different regions, languages, currencies, number formats, time zones, and right-to-left layouts. Testing all these variations manually is error-prone and time-consuming.
Solution: Test with localized builds, use automated locale switching on simulators, and validate UI layouts for languages that cause string expansion or direction changes.
5. Inconsistencies in Test Results
Automated tests may fail intermittently due to timing issues, animations, asynchronous operations, or unstable test environments. These inconsistencies undermine trust in the test suite and slow down development.
Solution: Stabilize tests by using explicit waits, disabling animations during UI tests, improving mock data consistency, and running tests in clean, reproducible environments.
If you would like to learn about the top 10 mobile app testing challenges from a tester's perspective, check out this post .
The iOS Testing Pyramid
When testing iOS applications, Apple suggests to aim for "pyramid" distribution of tests. The main strategy includes including a large number of fast, well-isolated unit tests that covers the application's logic, then a smaller number of integration tests, which will demonstrate that smaller parts connect properly. Then top with an even smaller number of UI and E2E tests to check correct behavior of real user flow.
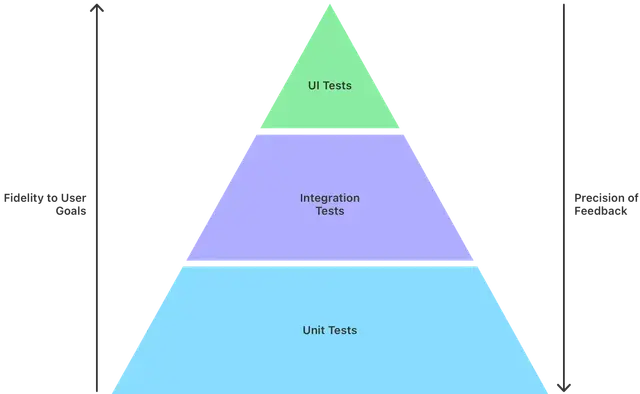
Focusing on the right mix of tests allows teams to catch issues early, reduce flaky test results, and speed up release cycles.
Unit Tests
Unit tests are small, isolated tests that focus on individual functions, view models, reducers, or other self-contained components. Because they cover small units of functionality, they are fast, highly reliable, and easy to automate. Unit tests form the foundation of the testing pyramid because they help ensure that each building block of the app behaves correctly before more complex testing layers are introduced.
Goal: Validate that individual components work as intended, providing fast and consistent feedback during development.
Integration Tests
Integration tests verify how multiple components work together. They focus on interactions between modules such as networking layers, data persistence, authentication, or UI controllers. These tests are slower and more resource-intensive than unit tests, but they are essential for ensuring that interconnected systems function harmoniously.
Goal: Catch issues that only appear when pieces of code are combined under realistic conditions.
UI & End-to-End (E2E) Tests
E2E and UI tests simulate real-world scenarios by interacting with the app exactly as a user would. They validate gestures, navigation, form submissions, and full workflows such as onboarding or checkout. While these tests provide high confidence, they are time-consuming, more prone to flakiness, and require careful maintenance.
Because of this, the pyramid recommends keeping the number of E2E tests limited and focusing them on the most critical user journeys.
Goal: Confirm the full app experience works correctly from the user's perspective.
iOS Unit Testing
iOS unit testing focuses on validating small, isolated pieces of logic within an application. These tests ensure that individual functions, classes, view models, and business rules behave exactly as expected. Because unit tests run quickly and do not rely on external systems like network calls, databases, or UI components, they provide fast and reliable feedback during development. Unit tests form the bottom layer of the testing pyramid and typically make up the largest portion of the test suite.
Xcode includes a built-in testing framework called XCTest, which allows developers to write, execute, and debug unit tests directly within the development environment.
When creating a new project in Xcode, selecting "Include Tests" will automatically generate a Unit Test target for you. If the project has already been created without tests, you can add them later by navigating to: File → New → Target → iOS → Unit Testing Bundle .
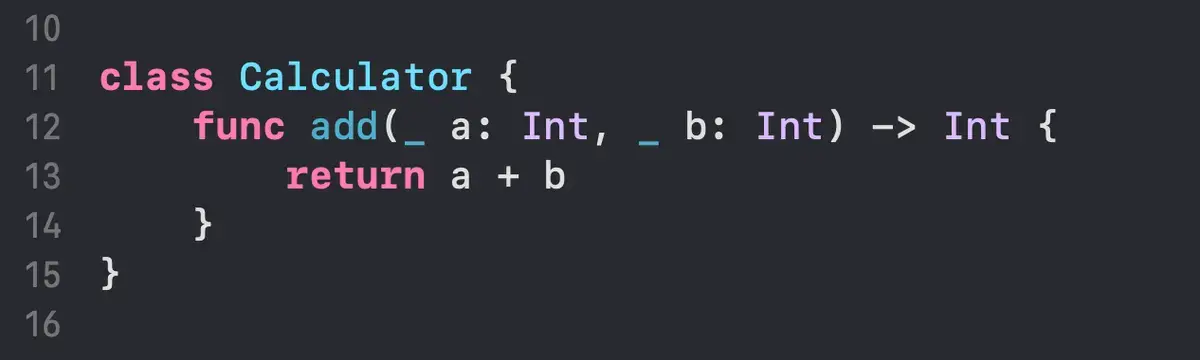
Example Unit Test Scenario
Scenario: You have a simple Calculator class with a function that adds two numbers. You want to ensure the addition logic always works correctly.
Code Under Test:
Unit Test for This Scenario:
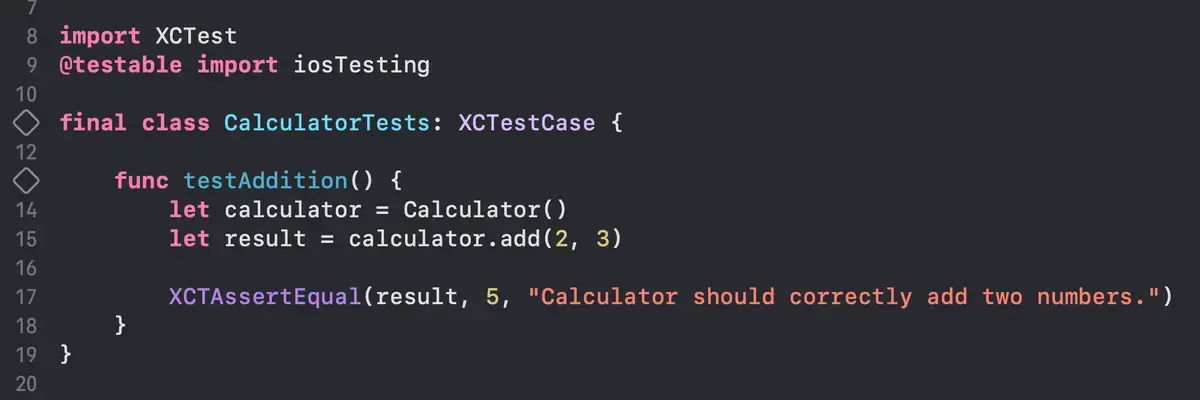
This simple example demonstrates the core idea of unit testing: isolating one small piece of logic and verifying its behavior with predictable inputs and outputs.
iOS Unit Testing Best Practices
- Use a Testing Framework: Use a reliable framework like XCTest to structure, run, and validate your tests consistently within Xcode.
- Write Small and Focused Tests: Each test should validate one specific behavior or outcome, making tests easier to understand, maintain, and debug.
- Use Mocks and Stubs: Replace external dependencies with mocks and stubs so your unit tests stay isolated, predictable, and fast.
- Test Coverage: Track code coverage to ensure the most critical parts of your logic are thoroughly tested without aiming for unrealistic 100% coverage.
- Continuous Integration: Run unit tests automatically on every commit or pull request through CI to catch regressions early and maintain code quality over time. Platforms like Appcircle makes this easier by running your unit tests as part of a fully automated iOS CI pipeline, ensuring fast feedback and consistent test results for every build.
iOS UI & E2E Testing
What is iOS UI Testing?
UI tests is the top indicator an application works as expected. UI Testing verify the appearance and the functionality of the iOS application. It verifies that the app's user interface behaves correctly in response to user interactions.
These tests are written using XCUITest, the UI testing framework built into Xcode, which allows the automation of gestures, navigation, text entry, alerts, and other user actions. UI tests help detect visual regressions, layout issues, broken navigation, and failures that appear only when interacting with the full UI layer.
When creating a new project in Xcode, selecting "Include Tests" will automatically generate a UI Test target for you. If the project has already been created without tests, you can add them later by navigating to: File → New → Target → iOS → UI Testing Bundle.
Example UI Test Scenario
Scenario: You want to verify that when a user enters their name into a text field and taps a "Continue" button, the app navigates to the next screen and displays a greeting message.
UI Test For this Scenario:
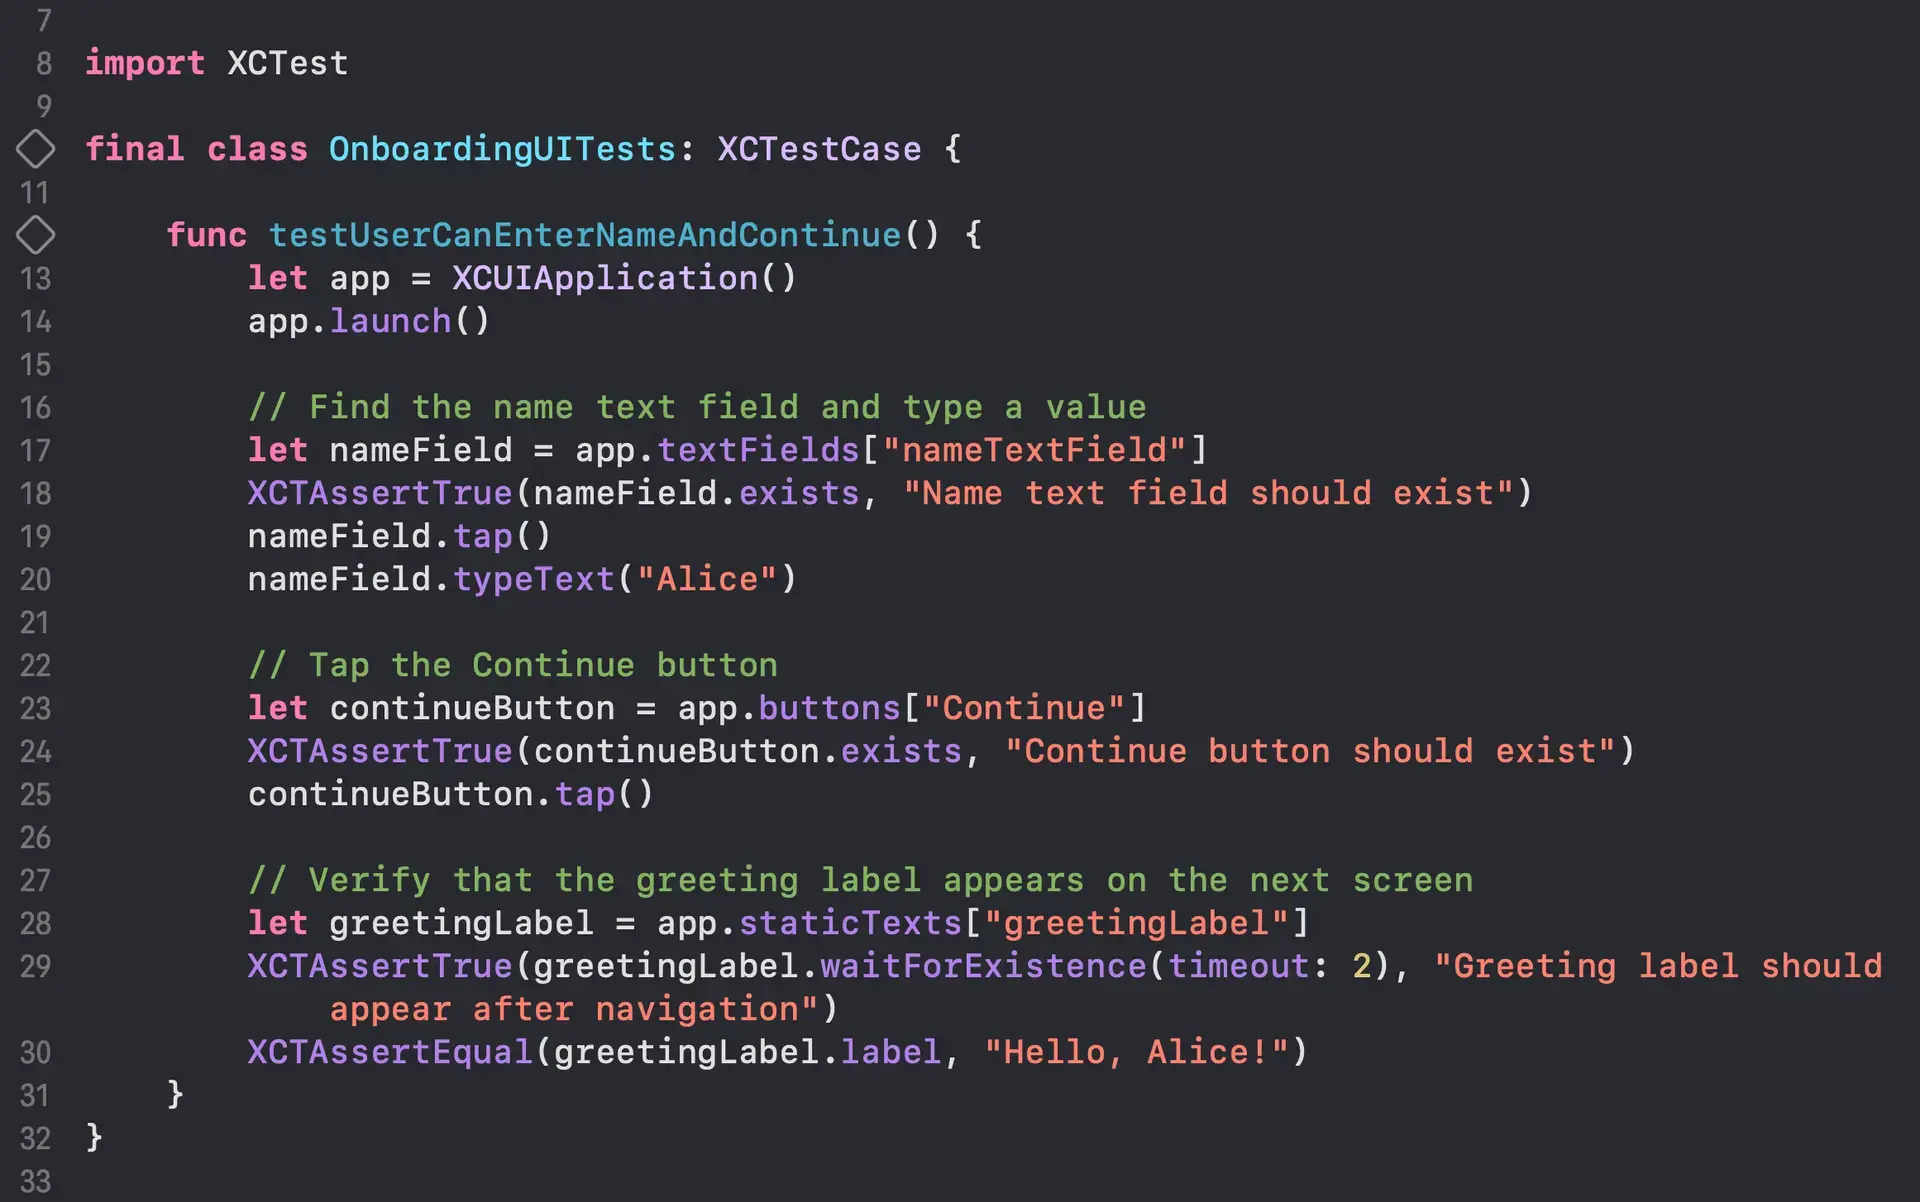
This simple example demonstrates the core idea of UI testing: interacting with real UI components and verifying user-visible behavior.
iOS UI Testing Best Practices
- Keep Tests Focused on User Flows: Limit UI tests to essential interactions and visible behaviors, and avoid testing business logic that is better handled by unit or integration tests.
- Disable Animations When Possible: Animations can introduce timing inconsistencies during test execution. Disabling them helps create more stable and predictable results.
- Run UI Tests on Real Devices Regularly: Simulators are convenient for development, but real device testing provides more accurate performance, rendering, and interaction behavior.
- Avoid Hardcoded Delays: Use XCTest expectations or predicate-based waits instead of fixed sleep timers to reduce flakiness and improve test reliability.
- Automate UI Tests When Possible: Automating frequently used UI flows improves coverage, reduces repetitive manual effort, and helps catch regressions earlier in the development cycle.
What is iOS E2E Testing?
iOS E2E testing validates complete user journeys from start to finish, ensuring all systems work together as expected. These tests simulate a real user scenario, such as launching the app, logging in, browsing content, and completing a transaction. E2E tests cover multiple layers of the app, including UI, networking, state management, and backend communication.
While powerful, E2E tests are slower to run and more sensitive to changes, so they should be limited to a small set of high-impact scenarios.
Example E2E Testing Scenario
Scenario: A user launches the app, logs in with valid credentials, and successfully reaches the home screen where personalized content is displayed.
App Flow Under Test:
- User opens the app
- User enters email and password
- User taps the "Log In" button
- App validates credentials and loads user data
- Home screen appears with a welcome message
This simple example demonstrates the core idea of E2E testing: validates a complete user journey that spans multiple layers of the application, from UI interaction to backend communication and final state rendering.
Automating iOS App Testing
Manual iOS App Testing
Manual testing allows testers to verify app behavior directly on real devices or simulators. It enables teams to focus on evaluating the application's functionality and user experience without needing to write test scripts.
While manual testing provides valuable insights into usability, visual accuracy, and user flows, it can become slow, repetitive, and difficult to scale as the app grows. It is also time-consuming, non-scalable, and prone to human error. Relying solely on manual testing increases the risk of missed regressions and can delay release cycles, especially in fast-paced development environments.
Automatic iOS App Testing
Teams do not have to handle the entire iOS testing process manually. Automating these tests is possible using dedicated tools and frameworks that streamline validation across different layers of the app. Automating iOS app testing helps teams run tests faster, catch regressions earlier, and deliver more stable releases. This is crucial for fast and reliable release cycles, which is the workflow many modern teams follow. Handling everything manually can quickly become a bottleneck.
With the help of tools like XCTest, XCUITest, Appium, BrowserStack, and Maestro, developers can validate logic, UI interactions, and end-to-end scenarios automatically.
- XCTest: A unit testing framework built into Xcode that allows developers to test app logic and functionality.
- XCUITest: A UI testing framework provided by Apple for automating user interactions such as taps, gestures, navigation, and alerts.
- Appium: A cross-platform automation tool that allows testing iOS and Android apps using a single API and supports multiple programming languages.
- BrowserStack: A cloud-based device testing platform that provides access to real iOS devices for automated and manual testing at scale.
- Maestro: A lightweight, script-based mobile UI testing tool that focuses on stability, ease of use, and fast test execution.
Automation is especially valuable for repetitive tasks such as login flows, form validations, app navigation, and regression checks. By reducing manual effort, teams can focus on feature development while maintaining high and consistent product quality.
Automating iOS Tests in CI/CD Pipelines
Running automated iOS tests inside a CI/CD pipeline ensures that every commit, pull request, or release candidate is validated consistently and reliably. A CI system builds the app, runs unit tests, executes UI and E2E tests when needed, and provides fast feedback to developers.
Using CI/CD helps teams detect issues early, maintain quality standards, and avoid releasing regressions to testers or production users.
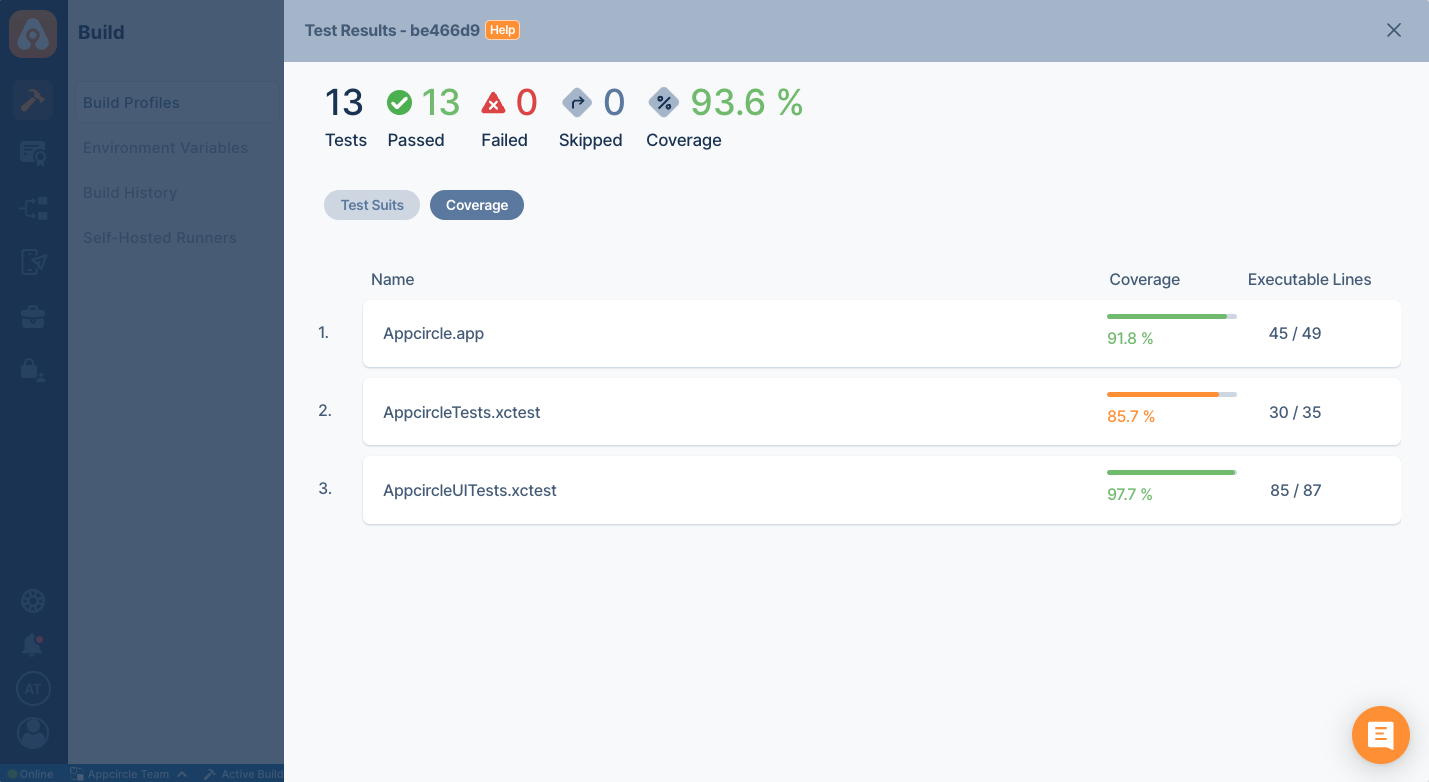
Platforms like Appcircle make test automation easier by integrating the testing steps into the CI/CD pipeline with hundreds of ready-to use plugins and by providing detailed test reports that includes results and coverage reports.
Real-Life Example: Automated Testing on a Pull Request
- A developer creates a pull request for a new feature or bug fix.
- Appcircle automatically triggers the CI pipeline for the PR.
- The pipeline fetches the branch, resolves dependencies, and builds the app in a clean macOS environment.
- XCTest unit tests run to validate the new or updated logic.
- XCUITest UI tests run on simulators to verify user flows such as login, navigation, or form submissions.
- If a test fails, the PR is marked as failing and the developer receives detailed error logs and screenshots.
- If all tests pass, the PR becomes eligible for review and merge, ensuring only stable, well-tested code reaches the main branch.
This workflow provides teams with confidence that new code does not introduce bugs, regressions, or broken user experiences.
iOS Simulator vs Real Device Testing
Testing on both iOS simulators and real devices is essential for validating how an app behaves in different environments. Simulators offer speed and convenience, while physical devices provide accurate feedback on performance, hardware behavior, and real-world usage conditions. A balanced testing strategy relies on both to ensure complete coverage.
Quick reminder: The build method changes depending on whether the application will be tested on a simulator or on a real device. For more information, check out the iOS Build guide.
When to Use iOS Simulators
iOS simulators are ideal for early development and fast feedback cycles. They allow developers to quickly run the app on different device types and iOS versions without needing physical hardware.
Simulators are best for:
- Rapid development and debugging: Easily debug your app across multiple device types and OS versions, including hardware you may not have immediate access to.
- Build faster, fix quicker: Simulators provide quick launch times and fast execution, helping developers validate changes almost instantly.
- Testing multiple screen sizes and orientations: Simulators make it simple to preview how the UI adapts to various form factors, from small iPhones to large iPads.
When Real Devices Are Required
Real devices provide the most accurate representation of how users experience the app. Physical devices can reveal issues that simulators cannot replicate, especially those related to hardware behavior, sensors, performance, and real-world environments.
Real devices are required for:
- Performance testing: Accurately measuring CPU, memory usage, rendering performance, and thermal impact.
- Network behavior under real conditions: Validating app behavior on Wi-Fi, cellular networks, weak signal areas, or intermittent connections.
- Hardware-specific features: Testing components like the camera, GPS, Face ID, Bluetooth, gyroscope, and motion sensors.
- Installation and notification behavior: Verifying installation flows, app updates, background execution, and push notifications.
iOS Beta Testing & Distribution
Beta testing allows teams to validate app behavior under real-world conditions before releasing to production. It helps uncover usability issues, device-specific bugs, and performance problems that may not appear during internal development. Apple provides multiple options for distributing pre-release builds, the most common being TestFlight and Ad Hoc distribution.
TestFlight Internal & External Testing

TestFlight is Apple's official beta testing platform for distributing pre-release apps to testers. It supports both internal teams and external testers, making it suitable for gathering structured feedback before submitting the app to the App Store.
Internal Testing: Internal testers (up to 100 team members in App Store Connect) can receive builds immediately after upload without requiring Apple's review. This method is ideal for development teams, QA engineers, and stakeholders who need rapid access to new builds.
External Testing: External testers (up to 10,000 users) require a brief compliance review from Apple before they can access the build. This option is ideal for capturing feedback from real users with different devices and OS types, beta communities, or selected customers in a controlled environment.
Tip: With Appcircle's Publish module, you can manage TestFlight beta distribution directly from your CI/CD pipeline, including configuring tester groups and submitting builds for both internal and external testing without switching between App Store Connect and your build environment. See Submit for Beta Testing in the Appcircle documentation for details.
iOS Ad Hoc Distribution
Ad Hoc distribution allows teams to distribute an app directly to specific devices identified by their UDIDs. This method supports up to 100 registered devices per year and does not require App Store review or TestFlight approval.
Ad Hoc builds are packaged with a provisioning profile that includes the list of approved devices. Anyone with a registered device can install the build through a direct download link or installation page. For more details on how the iOS application should be signed before Ad Hoc distribution, check out our iOS Code Signing Guide.
User Acceptance Testing (UAT)
User Acceptance Testing (UAT) ensures that the app meets user needs and business requirements before release. It is the final validation phase where real users, stakeholders, or selected testers evaluate whether the app performs as expected and delivers the intended end-to-end experience.
UAT typically occurs using TestFlight or Ad Hoc builds, giving testers access to near-production versions of the app in real-world conditions. The goal is to confirm that key workflows, features, and user journeys function correctly before launch. Successful UAT ensures the app is production-ready, reduces the risk of post-release issues, and validates alignment with business and user expectations.
Best Practices for iOS Testing
1. Ensure testers are using the correct app version
Make sure internal and external testers install and test the exact build intended for validation. This prevents outdated or mismatched builds from skewing results or hiding regressions. Adding a version badge to the app icon can be extremely helpful for identifying which build is being tested.
2. Remove access when testers leave the team
Automatically revoke distribution access for former employees or external testers to maintain security and prevent unauthorized app sharing. Using SSO or LDAP-based access control helps ensure only active, approved users can access your testing builds.
3. Test across diverse devices and OS versions
Include a range of iPhones and iPads with different screen sizes, hardware capabilities, and iOS versions to uncover compatibility issues early.
4. Collect structured feedback from testers
Provide testers with a clear process for reporting bugs, steps to reproduce, screenshots, logs, and device information to improve the accuracy and speed of issue resolution.
5. Validate real-world scenarios and environments
Test under varying network conditions, low battery states, backgrounding, and performance-intensive workflows to ensure the app behaves reliably in everyday usage.
6. Automate recurring testing tasks
Use automated UI tests, regression suites, and CI/CD workflows to reduce manual effort and catch issues consistently on every build.
FAQs
What is an iOS Tester?
What is Apple's tool for iOS testing?
What is the difference between mobile UI testing and web UI testing?
How do I deploy an iOS app for external testing?
Which provisioning profile and certificate do I need for Ad Hoc distribution?
Do I need a Mac to test or build an iOS app?
Why do some iOS tests behave differently on real devices vs. simulators?
How do I test push notifications on iOS?
How do I run iOS tests automatically in CI/CD?
What is the difference between TestFlight internal and external testing?
Get Started with Appcircle
Save time, reduce costs, and increase developer productivity
Get informed about news, new releases, and mobile DevOps.